Step by step instructions to Make Mini Macrame for Jewelry
As a customary art, macrame has been around for a considerable length of time, however lately, this craft of tying has stolen the spotlight. It's regularly used to make lovely tapestries that can spruce up at any home, yet with the correct materials, you can make enchanting smaller than expected macrame for gems. The best part? You don't have to utilize favor bunches to understand that exemplary macrame look. Here's the way to do it.
 (Picture: Kirsten Nunez)
Things You'll Need
- Cotton string
- Large bounce ring or key ring
- Tape
- Scissors
Tip
For this undertaking, a 25mm bounce ring was utilized. Don't hesitate to utilize any sort of ring that you have close by. Indeed, even an extra key chain ring can work.
 (Picture: Kirsten Nunez)
Tip
For a genuine macrame look, utilize basic, uncoated cotton string. Avoid the hemp, nylon and polyester materials - these are normally too solid to look like macrame.
Step 1
Cut six strands of cotton line measuring no less than 20 inches each.
 (Picture: Kirsten Nunez)
Step 2
Overlay one strand into equal parts (envisioned left in the photograph underneath). Embed and twist the circle through the hop ring (right). This is the begin of a larkshead tie, the most well-known approach to begin a macrame design.
 (Picture: Kirsten Nunez)
Step 3
Draw whatever is left of the rope through the circle. To do this, embed your fingers through the circle, snatch the strand, and force it through (left). Force the string to fix (right). This finishes one larkshead hitch.
 (Picture: Kirsten Nunz)
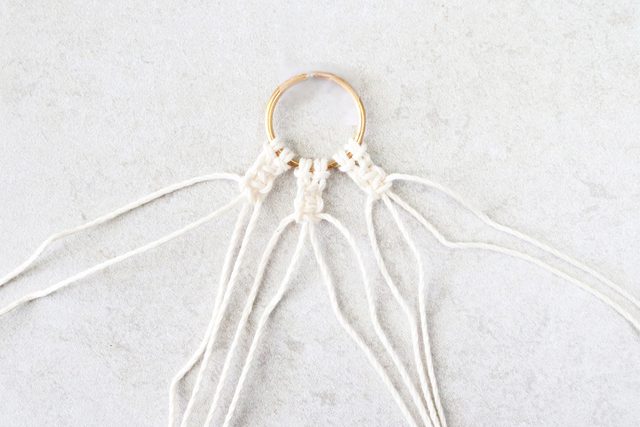
Step 4
Rehash with the rest of the line to make an aggregate of six larkshead ties. You'll be working with four strands (from two bunches) at once.
 (Picture: Kirsten Nunez)
Tip
Tape the ring to a tough surface like a table - this will make tying hitches substantially simpler.
Step 5
Put aside the initial four strands. Place the center two together and separate the external two. This is the start of a square bunch, another normal macrame hitch.
 (Picture: Kirsten Nunez)
Step 6
Curve the left strand and place it over the inside. It ought to make a circle while the end should "spill" onto the correct side. Take the correct strand and lay it to finish everything.
 (Picture: Kirsten Nunez)
Step 7
Bring the correct strand under the inside. Embed it up and through the left-hand circle. The two strands should appear as though they're embracing the middle.
 (Picture: Kirsten Nunez)
Step 8
Force the two closures to fix. This finishes one portion of the square bunch.
 (Picture: Kirsten Nunez)
Step 9
This time, begin on the correct side. Twist and place the correct strand over the inside. Lay the left strand to finish everything.
 (Picture: Kirsten Nunez)
Step 10
Bring the left strand under the middle and through the correct circle.
 (Picture: Kirsten Nunez)
Step 11
Draw the two closures to fix. This progression finishes one square bunch.
 (Picture: Kirsten Nunez)
Step 12
Rehash Steps 6 through 11 to make another square bunch.
 (Picture: Kirsten Nunez)
Step 13
Make two square bunches with the following four strands. Rehash with the last four. You ought to have three arrangements of two square bunches each.
Isolate the first and last two outside strands. Gathering the middle strands into two gatherings of four.
 (Picture: Kirsten Nunez)
Step 14
Make another two square bunches in each set.
 (Picture: Kirsten Nunez)
Step 15
Bring the outside strands down. Make three arrangements of two square bunches. Once more, work in three gatherings of four strands each.
 (Picture: Kirsten Nunez)
Step 16
Trim the abundance string, leaving no less than three crawls underneath the smaller than normal macrame. You can cut straight crosswise over or at an edge, contingent upon the look you need.
 (Picture: Kirsten Nunez)
Tip
To fix the rope, utilize an iron (this is another justifiable reason motivation to utilize uncoated cotton string). Make a point to chip away at a strong warmth safe surface, similar to a pressing board. You can likewise utilize a hair straightener.
 (Picture: Kirsten Nunez)
To transform your smaller than normal macrame into a dear accessory, add it to a long strand of chain. For a more fun loving look, hang it on a strand of dabs.
 (Picture: Kirsten Nunez)
Needing another match of ear confection? Make two scaled down macrame. Join a hoop snare to each hop ring.
source:ehow.com by:Kirsten Nunez
Things You'll Need
- Cotton string
- Large bounce ring or key ring
- Tape
- Scissors
Tip
For this undertaking, a 25mm bounce ring was utilized. Don't hesitate to utilize any sort of ring that you have close by. Indeed, even an extra key chain ring can work.
Tip
For a genuine macrame look, utilize basic, uncoated cotton string. Avoid the hemp, nylon and polyester materials - these are normally too solid to look like macrame.
Step 1
Cut six strands of cotton line measuring no less than 20 inches each.
Step 2
Overlay one strand into equal parts (envisioned left in the photograph underneath). Embed and twist the circle through the hop ring (right). This is the begin of a larkshead tie, the most well-known approach to begin a macrame design.
Step 3
Draw whatever is left of the rope through the circle. To do this, embed your fingers through the circle, snatch the strand, and force it through (left). Force the string to fix (right). This finishes one larkshead hitch.
Step 4
Rehash with the rest of the line to make an aggregate of six larkshead ties. You'll be working with four strands (from two bunches) at once.
Tip
Tape the ring to a tough surface like a table - this will make tying hitches substantially simpler.
Step 5
Put aside the initial four strands. Place the center two together and separate the external two. This is the start of a square bunch, another normal macrame hitch.
Step 6
Curve the left strand and place it over the inside. It ought to make a circle while the end should "spill" onto the correct side. Take the correct strand and lay it to finish everything.
Step 7
Bring the correct strand under the inside. Embed it up and through the left-hand circle. The two strands should appear as though they're embracing the middle.
Step 8
Force the two closures to fix. This finishes one portion of the square bunch.
Step 9
This time, begin on the correct side. Twist and place the correct strand over the inside. Lay the left strand to finish everything.
Step 10
Bring the left strand under the middle and through the correct circle.
Step 11
Draw the two closures to fix. This progression finishes one square bunch.
Step 12
Rehash Steps 6 through 11 to make another square bunch.
Step 13
Make two square bunches with the following four strands. Rehash with the last four. You ought to have three arrangements of two square bunches each.
Isolate the first and last two outside strands. Gathering the middle strands into two gatherings of four.
Step 14
Make another two square bunches in each set.
Step 15
Bring the outside strands down. Make three arrangements of two square bunches. Once more, work in three gatherings of four strands each.
Step 16
Trim the abundance string, leaving no less than three crawls underneath the smaller than normal macrame. You can cut straight crosswise over or at an edge, contingent upon the look you need.
Tip
To fix the rope, utilize an iron (this is another justifiable reason motivation to utilize uncoated cotton string). Make a point to chip away at a strong warmth safe surface, similar to a pressing board. You can likewise utilize a hair straightener.
To transform your smaller than normal macrame into a dear accessory, add it to a long strand of chain. For a more fun loving look, hang it on a strand of dabs.
Needing another match of ear confection? Make two scaled down macrame. Join a hoop snare to each hop ring.
source:ehow.com by:Kirsten Nunez